Aruba.it (@aruba.it, @technet.it) settings

For @custom-domain.ext mailbox format go here:
Aruba.it custom domains IMAP, POP3, SMTP settings

POP3

Server: pop3.aruba.it
SSL: true-implicit
Port: 995 (default)
User :  email address (e.g.: name@aruba.it or name@technet.en)

using (Pop3 client = new Pop3())
{
    client.ConnectSSL("pop3.aruba.it");
    client.UseBestLogin("user@aruba.it", "password");

    // ...

    client.Close();
}
Next step: receive emails using POP3.

IMAP

Server:  imap.aruba.it
SSL: true-implicit
Port: 993 (default)
User: email address (e.g.: name@aruba.it or name@technet.en)

using (Imap client = new Imap())
{
    client.ConnectSSL("imap.aruba.it");
    client.UseBestLogin("user@aruba.it", "password");

    // ...

    client.Close();
}

Next step: receive unseen emails using IMAP.

SMTP

Server:  smtp.aruba.it
SSL: true-implicit
Port:  465 (default)
User: email address (e.g.: name@aruba.it or name@technet.en)

using (Smtp client = new Smtp())
{
    client.ConnectSSL("smtp.aruba.it");
    client.UseBestLogin("user@aruba.it", "password");

    // ...

    client.Close();
}

Aruba.it (@custom-domain.ext) settings

For @aruba.it and @technet.it mailbox formats go here:
@aruba.it and @technet.it IMAP, POP3, SMTP settings

POP3

Server: pop3s.aruba.it
SSL: true-implicit
Port: 995 (default)
User :  email address (e.g.: name@aruba.it or name@technet.en)

using (Pop3 client = new Pop3())
{
    client.ConnectSSL("pop3s.aruba.it");
    client.UseBestLogin("user@custom-domain.ext", "password");

    // ...

    client.Close();
}

Next step: receive emails using POP3.

IMAP

Server:  imaps.aruba.it
SSL: true-implicit
Port: 993 (default)
User: email address (e.g.: name@aruba.it or name@technet.en)

using (Imap client = new Imap())
{
    client.ConnectSSL("imaps.aruba.it");
    client.UseBestLogin("user@custom-domain.ext", "password");

    // ...

    client.Close();
}


Next step: receive unseen using IMAP.

SMTP

Server:  smtps.aruba.it
SSL: true-implicit
Port:  465 (default)
User: email address (e.g.: name@aruba.it or name@technet.en)

using (Smtp client = new Smtp())
{
    client.ConnectSSL("smtps.aruba.it");
    client.UseBestLogin("user@custom-domain.ext", "password");

    // ...

    client.Close();
}


OAuth 2.0 with Office365/Exchange IMAP/POP3/SMTP

This article shows how to implement OAuth 2.0 desktop flow to access Office365 via IMAP, POP3 or SMTP using Mail.dll .net email client.

Make sure IMAP/POP3/SMTP is enabled for your organization and mailbox:
Enable IMAP/POP3/SMTP in Office 365

Register your application in Azure Portal, here’s a detailed guide how to do that:
https://docs.microsoft.com/en-us/azure/active-directory/develop/quickstart-register-app

Remember to add authentication entries (localhost is needed for .net core):

RedirectUri

.NET desktop: https://login.microsoftonline.com/common/oauth2/nativeclient
.NET core/.NET 5,6,7+: http://localhost
ASP.NET: your application custom url

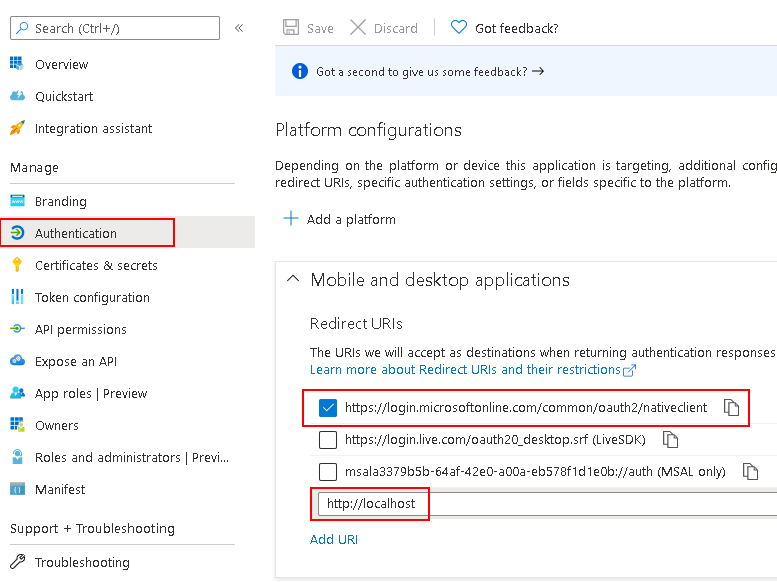
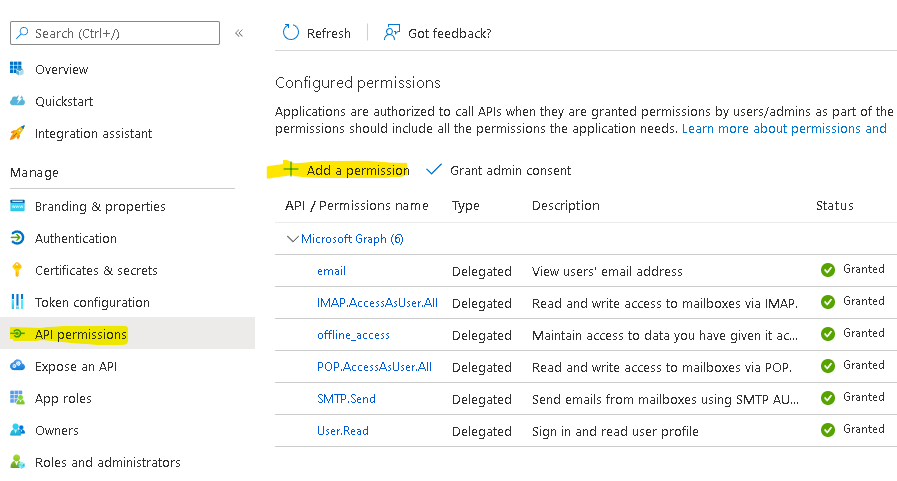
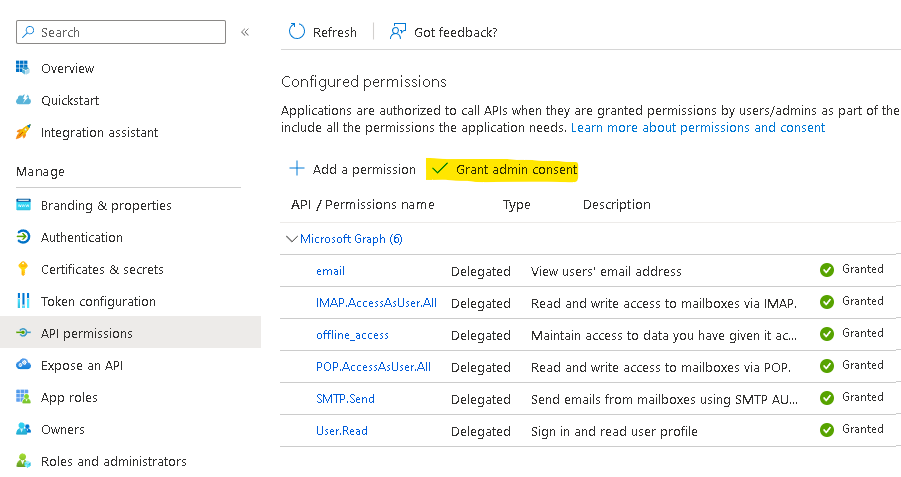
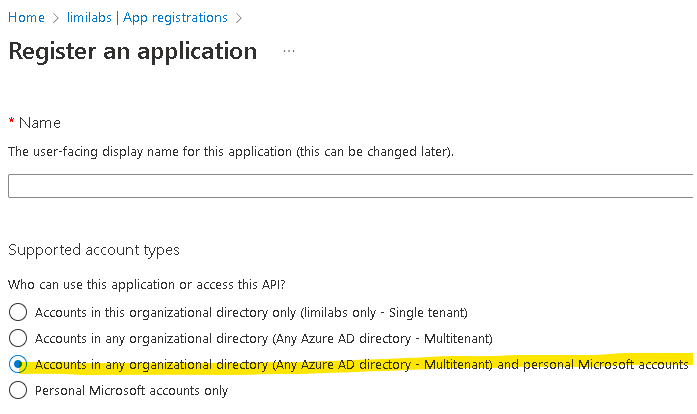
Then you need to apply correct API permissions and grant the admin consent for your domain.

In the API permissions / Add a permission wizard, select Microsoft Graph and then Delegated permissions to find the following permission scopes listed:

  • offline_access
  • email
  • IMAP.AccessAsUser.All
  • POP.AccessAsUser.All
  • SMTP.Send

Remember to Grant admin consent:

Use Microsoft Authentication Library for .NET (MSAL.NET) nuget package to obtain an access token:
https://www.nuget.org/packages/Microsoft.Identity.Client/

string clientId = "Application (client) ID";
string tenantId = "Directory (tenant) ID";

// for @outlook.com/@hotmail accounts instead of setting .WithTenantId use:
// .WithAuthority(AadAuthorityAudience.PersonalMicrosoftAccount)

var app = PublicClientApplicationBuilder
                .Create(clientId)
                .WithTenantId(tenantId)
                .WithDefaultRedirectUri()
                .Build();
// This allows saving access/refresh tokens to some storage
TokenCacheHelper.EnableSerialization(app.UserTokenCache);

var scopes = new string[] 
{
    "offline_access",
    "email",
    "https://outlook.office.com/IMAP.AccessAsUser.All",
    "https://outlook.office.com/POP.AccessAsUser.All",
    "https://outlook.office.com/SMTP.Send",
};

In addition, you should request offline_access scope. When a user approves the offline_access scope, your app can receive refresh tokens from the Microsoft identity platform token endpoint. Refresh tokens are long-lived. Your app can get new access tokens as older ones expire.

Now acquire the access token and user email address:

string userName;
string accessToken;

var account = (await app.GetAccountsAsync()).FirstOrDefault();

try
{
    AuthenticationResult refresh = await app
        .AcquireTokenSilent(scopes, account)
        .ExecuteAsync();

    userName = refresh.Account.Username;
    accessToken = refresh.AccessToken;
}
catch (MsalUiRequiredException e)
{
    var result = await app.AcquireTokenInteractive(scopes)
        .ExecuteAsync();

    userName = result.Account.Username;
    accessToken = result.AccessToken;
}

On the first run user will see a Microsoft login screen, with option to log-in, using a known account and granting access to the app (if needed):

Finally you can connect using IMAP/POP3/SMTP, authenticate and download user’s emails:

using (Imap client = new Imap())
{
    client.ConnectSSL("outlook.office365.com");
    client.LoginOAUTH2(userName, accessToken);
 
    client.SelectInbox();

    List<long> uids = imap.Search(Flag.Unseen);
    foreach (long uid in uids)
    {
        IMail email = new MailBuilder()
                .CreateFromEml(imap.GetMessageByUID(uid));
        string subject = email.Subject;
   }

    client.Close();
} 

Any organization and personal accounts

To access accounts from any organization and personal accounts as well, you need to specify correct account types when you create the App in your AD:

Additionally you need to use:    

    .WithAuthority(
        AadAuthorityAudience.AzureAdAndPersonalMicrosoftAccount
        )

instead of

    .WithTenantId(tenantId)

when creating the app:

 var app = PublicClientApplicationBuilder
    .Create(clientId)
    .WithAuthority(
        AadAuthorityAudience.AzureAdAndPersonalMicrosoftAccount
        )
    .WithDefaultRedirectUri()
    .Build();

Token serialization

Below is a simple implementation that saves MSAL token cache to file:

static class TokenCacheHelper
{
    public static void EnableSerialization(ITokenCache tokenCache)
    {
        tokenCache.SetBeforeAccess(BeforeAccessNotification);
        tokenCache.SetAfterAccess(AfterAccessNotification);
    }

    private static readonly string _fileName = "msalcache.bin3";

    private static readonly object _fileLock = new object();


    private static void BeforeAccessNotification(TokenCacheNotificationArgs args)
    {
        lock (_fileLock)
        {
            byte[] data = null;
            if (File.Exists(_fileName))
                data = File.ReadAllBytes(_fileName);
            args.TokenCache.DeserializeMsalV3(data);
        }
    }

    private static void AfterAccessNotification(TokenCacheNotificationArgs args)
    {
        if (args.HasStateChanged)
        {
            lock (_fileLock)
            {
                byte[] data = args.TokenCache.SerializeMsalV3();
                File.WriteAllBytes(_fileName, data);
            }
        }
    }
};

Please note that most likely you should store this cache in an encrypted form in some kind of a database.
Consider using MSAL token serialization implementations available here:

https://docs.microsoft.com/en-us/azure/active-directory/develop/msal-net-token-cache-serialization


Get Mail.dll

NavigateToTest VS2019 extension

Extension is available for other Visual Studio versions:

You can download the extension here:
NavigateToTest Visual Studio 2019 extension

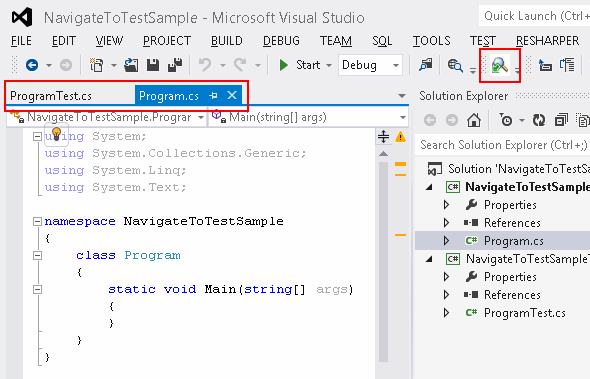
Here’s the latest version that supports Visual Studio 2019.

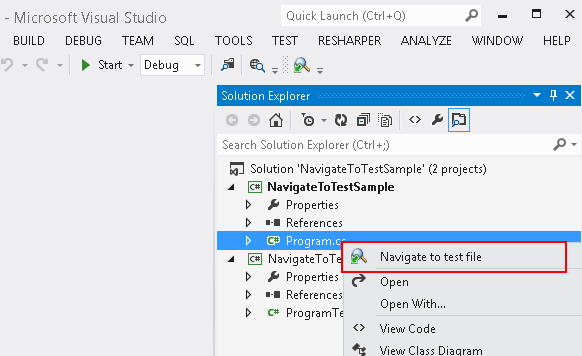
Extension is convention based. It matches ClassName file with ClassNameTest or ClassNameTests and vice-versa, so you can easily navigate to the test file and back.

Here are some screenshots:

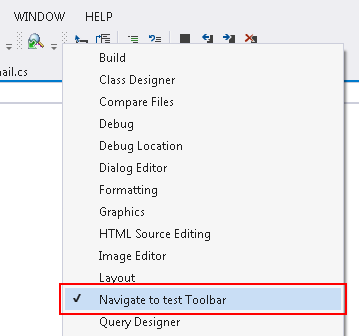
Here’s the toolbar name, in case it is not added automatically:

You can download the extension here:
NavigateToTest Visual Studio 2019 extension

Helpful POP3 and IMAP Exchange 2019 links

Here is the list of some helpful links regarding IMAP and POP3 protocols in Exchange 2019:

Enable IMAP4 in Exchange 2019

Enable POP3 in Exchange 2019

POP3 and IMAP4

Public folders in Exchange 2019
Public folders and IMAP

Shared mailboxes in Exchange 2019
Accessing shared and delegated mailboxes